Contents
Butterfly iQ / iQ+
Recording / clip control
- Tap the video-camera icon to begin recording a cine loop; default length is 60 seconds if not stopped manually
- Long-press the video button to set a maximum cine length (e.g., 6 s) so recordings auto- stop
Freeze / capture still
- Tap the freeze (snowflake) icon to pause live imaging, then tap the camera icon to save a still
Exporting / sharing
- From Butterfly Cloud, download studies (cine as MP4/DICOM, images as PNG/DICOM)
- In the app, tap Share, choose de-identified or with PHI, select the ScanHub by GUSI app, and tap Send
Tips / cautions
- Because the default is 60 s, always stop early; use the max-cine-length option
- Check firmware/app support for shorter cine settings; confirm export format (MP4 or
DICOM preferred)
Philips Lumify
Recording / clip control
- Prospective loop capture: press Save Loop to capture a short cine (1 to ~10 s); loop length is configurable within preset bounds
Freeze / capture still
- Tap Freeze, then Save Image to capture the current frame
Exporting / sharing
- Export exams/images/cines to DICOM PACS, network share, local directory, or email
- Configure and test a DICOM destination from within the app
Tips / cautions
- Verify the DICOM destination is reachable — Lumify shows a red X / green check for connectivity
- Keep loops ≤6 s; confirm export format matches your portal (DICOM or MP4)
GE Vscan Air / Vscan Extend
Recording / clip control
- Tap Save Loop (circular arrow) to capture a retrospective cine of the last 2–6 seconds
- Adjust default duration under Settings → Loop Length (choose 5–6 s); clips save automatically to the current study
- Some versions allow Continuous Record for longer procedural clips
Freeze / capture still
- Tap Freeze to pause, then Store Image (camera icon) to save; scroll stored images in the review bar
Exporting / sharing
- Local: USB/SD card → Export Exam → DICOM, AVI, or JPEG
- PACS: select exam → Send to PACS (progress icon shows status)
- Cloud/mobile: share via secure cloud link or institutional email from the Vscan Air app
Tips / cautions
- Hold the probe steady several seconds before saving (retrospective capture)
- Label exam with view and side before exporting; verify destination shows the green ✓
- Back up regularly if using local storage; keep firmware/app updated
Generic Portable / Cart-Based Systems
Recording / clip control
- Press Cine Loop / Record; most systems buffer the last 5–10 s and save it when you press Store Cine
- Set cine length to 3–6 s under Image → Cine Settings to limit file size
Freeze / capture still
- Press Freeze, scroll cine memory with arrows/trackball, pick the best frame, press Store
Image; add annotations/measurements before saving
Exporting / sharing
- USB: Save to USB → JPEG or MP4
- PACS: configure a DICOM node under System → Network → DICOM Settings and test connectivity
- Archive: review under Patient → Exam List → Archive Review, then transfer to your workstation or upload to ScanHub
Tips / cautions
- Set depth/gain before recording — cine capture can’t fix poor optimization afterward
- Use standard presets (Abdomen, Cardiac, OB, Lung); label everything; convert proprietary formats to MP4/JPEG or DICOM
- Maintain backups and battery to prevent data loss
“Every scan is a step forward — practice, upload, learn, repeat.”
Which Scans to Upload
- Only de-identified files (no patient name or information)
- A combination of still images and videos, with multiple files per exam
- Make sure your images tell your story; submit a variety of scans, annotated if possible
- Include the minimum criteria needed to answer the sonographic questions for primary- care scan types
- Submit your best-quality images — or deliberately submit a subpar image with a comment such as “I only got a partial view of the gallbladder in image #2; how do I improve my technique?”
General Best Practices
- Optimize first: adjust depth, gain, and focus before recording; keep anatomical landmarks visible
- Clips + stills: clips (3–6 s) for motion, compression, physiology; stills for measurements and pathology
- Label clearly: view + side + scan type (e.g., “RUQ FAST – Right Kidney Long Axis”)
- Scan systematically: upload all standard required views; if incomplete, upload anyway and note what you struggled with
- Normal & abnormal: every scan helps learning; prioritize abnormal findings, technically challenging scans, or those you want feedback on
- Give the clinical scenario: e.g., “Patient with swollen, painful leg → rule out proximal
DVT”
- Ask focused questions: e.g., “Is this artifact or pathology?”
- Upload often and iteratively: mentors expect progress, not perfection — use feedback to improve subsequent scans
- Know your machine: see Part 6 for machine-specific capture and export tips
Obtaining Images
- Time: bring an ultrasound on hospital rounds; ask your medical assistant to room the ultrasound with a patient; start the POCUS exam while collecting history
- Confidence: practice what you’ll say to patients — they’re more receptive than you may think
- See GUSI’s blog post on overcoming barriers to scanning , or discuss with your fellowship mentor or group leader
Scan-Specific Upload Checklists
See the Minimum Image Criteria document (available to all GUSI POCUS Fellows) for detailed view requirements per scan type.
DVT
- Views: CFV, GSV confluence, FV/DFV bifurcation, and PV/trifurcation
- Clip vs still: clips for compression; stills optional
- Doppler: can help assess flow if compression is equivocal
- Pitfalls: mistaking artery for vein; not compressing enough
- Best practice: label structures (R/L, CFV, GSV, FV, DFV, PV)
FAST
- Views: RUQ, LUQ, pelvis both planes, subxiphoid
- Clip vs still: clips beneficial; stills optional
- Pitfalls: missing windows; missing inferior pole of right kidney; gain too high in suprapubic view
- Best practice: always fan through the entire recess
AAA
- Views: long & short axis, sweep to bifurcation
- Measure: outer-to-outer wall
- Clip vs still: still for diameter measurement; clip to show continuity proximal → distal
- Doppler: helps identify structures
- Pitfalls: mistaking IVC for aorta; not applying enough pressure
- Best practice: identify celiac trunk, hepatic/splenic artery, SMA, and renal arteries
Gallbladder
- Views: long & short axis, neck, CBD; patient in multiple positions
- Measure: wall thickness; CBD inner-to-inner
- Clip vs still: clip for stone rolling, wall edema, CBD identification; still for wall thickness and CBD measurements
- Doppler: to identify structures required for CBD
- Pitfalls: mistaking duodenum for gallbladder; inadequate fasting → contracted GB
- Best practice: zoom in when measuring wall thickness and CBD
Echo
- Views: PLAX, PSAX, A4C, subxiphoid (aim for at least three), and IVC
- Clip vs still: clip always for contractility; still for effusion or EPSS measurement
- Measure: M-mode for EPSS
- Doppler: for valves, regurgitation, or insufficiency
- Pitfalls: foreshortening LV; wrong orientation
- Best practice: heart fills ~⅔ of screen; chambers anechoic
MSK
- Views: long & short axis; dynamic motion; contralateral comparison
- Clip vs still: clip for dynamic tendon movement; still for measurements
- Doppler: power/color for increased flow
- Pitfalls: anisotropy (tendon looks hypoechoic if probe not perpendicular)
- Best practice: label structures; compare contralateral side
Lung
- Zones: anterior, lateral, posterior
- Clip vs still: clip for sliding and B-lines; still for M-mode
- Pitfalls: artifacts won’t appear if probe isn’t perpendicular to pleura
- Best practice: label; overgain for better artifacts
GI (Appendix)
- Target: appendix → compressibility, blind end
- Measure: diameter (>6 mm abnormal)
- Clip vs still: clip to show peristalsis; still for diameter measurement
- Doppler: power/color to assess increased flow
- Pitfalls: small bowel loop mistaken for appendix
Renal
- Views: both kidneys + bladder, long & short axis
- Measure: bladder volume
- Clip vs still: clip through the whole kidney; still for length and hydronephrosis grading
- Doppler: differentiate vessels vs hydronephrosis; twinkle artifact; ureter jets
- Pitfalls: not fanning through the entire kidney; always check both kidneys
- Best practice: fan through entire kidney and bladder, anterior-posterior and superior- inferior
Soft Tissue
- Views: long & short axis
- Measure: size and depth
- Clip vs still: clip to show swirling (pus); still for depth measurement
- Doppler: assess vascularity
- Pitfalls: not enough gel (compresses the lesion)
- Best practice: measure volume of abscesses
OB – 1st Trimester
- Views: uterus sagittal + transverse, adnexa
- Landmarks: gestational sac, yolk sac, embryo with heartbeat
- Measure: CRL, MSD, FHR (M-mode only)
- Clip vs still: clip required; still for CRL and FHR
- Pitfalls: scanning with an empty bladder
- Best practice: do not use any Doppler modality during the 1st trimester
OB – 2nd & 3rd Trimester
- Views: BPD, HC, AC, FL; placenta; AFI/MVP
- Measure: biometrics, amniotic fluid, FHR
- Clip vs still: stills for biometry; clips for fetal lie, placental edge, and fetal wellbeing
- Pitfalls: incomplete views; not using Doppler when measuring AFI or MVP
- Best practice: have the LMP and assess fetal weight
Common Pitfalls Across All Scans
- Uploading only stills — reviewers prefer clips for motion/compression (stills-only is appropriate where connectivity is poor)
- Clips longer than 6 seconds — harder to review, wastes storage
- Missing key views (e.g., only RUQ in FAST, only long axis in AAA)
- Unlabeled clips — reviewers can’t confirm anatomy (especially MSK)
- No measurements where required (AAA, OB, renal)
Maximizing Feedback Value
- Upload both normal and abnormal examples when possible
- Ask 1–3 focused questions (e.g., “Is this a B-line artifact vs a true B-line?”)
- After feedback arrives, revisit the original scan, compare comments to your images, then rescan and re-upload with improvements
Final Checklist Before Upload
- Cine loop ≤6 s recorded
- Still images saved for measurements
- Labels complete (view, side, scan type)
- Measurements included (AAA, OB, renal, GB, etc.)
- Clinical notes/questions written
- Exam submitted & synced in ScanHub
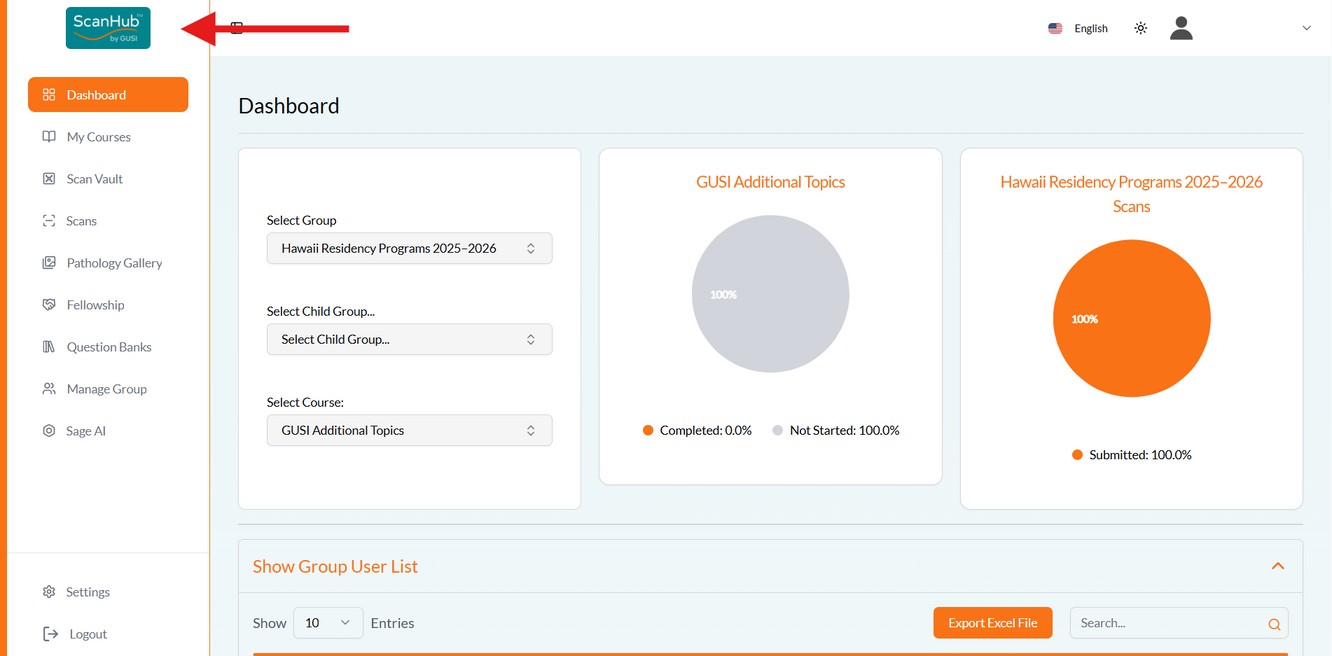
Accessing the Portal
- Open your browser and go to https://scanhub.upscan.com (Chrome or Safari recommended).
- Sign in with your GUSI credentials.
- You’ll land on your Dashboard, showing your progress.
Creating a New Exam & Uploading Files
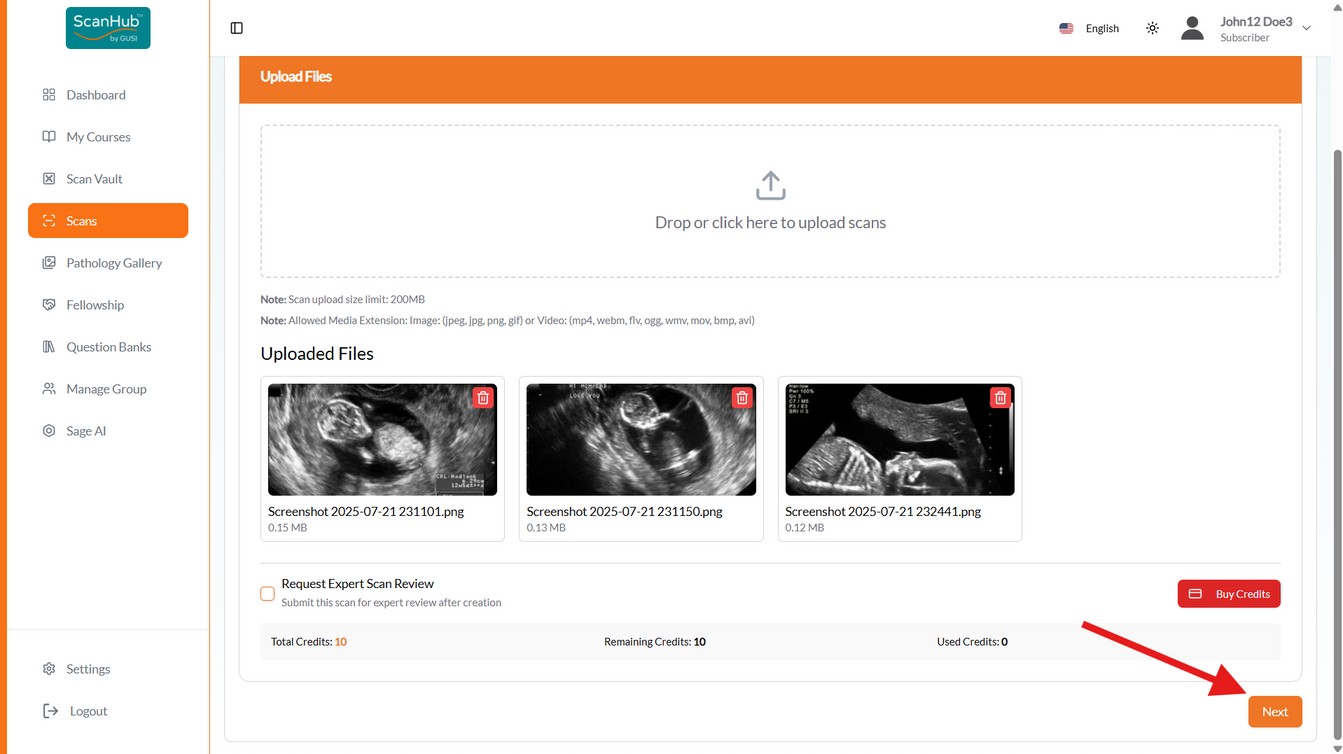
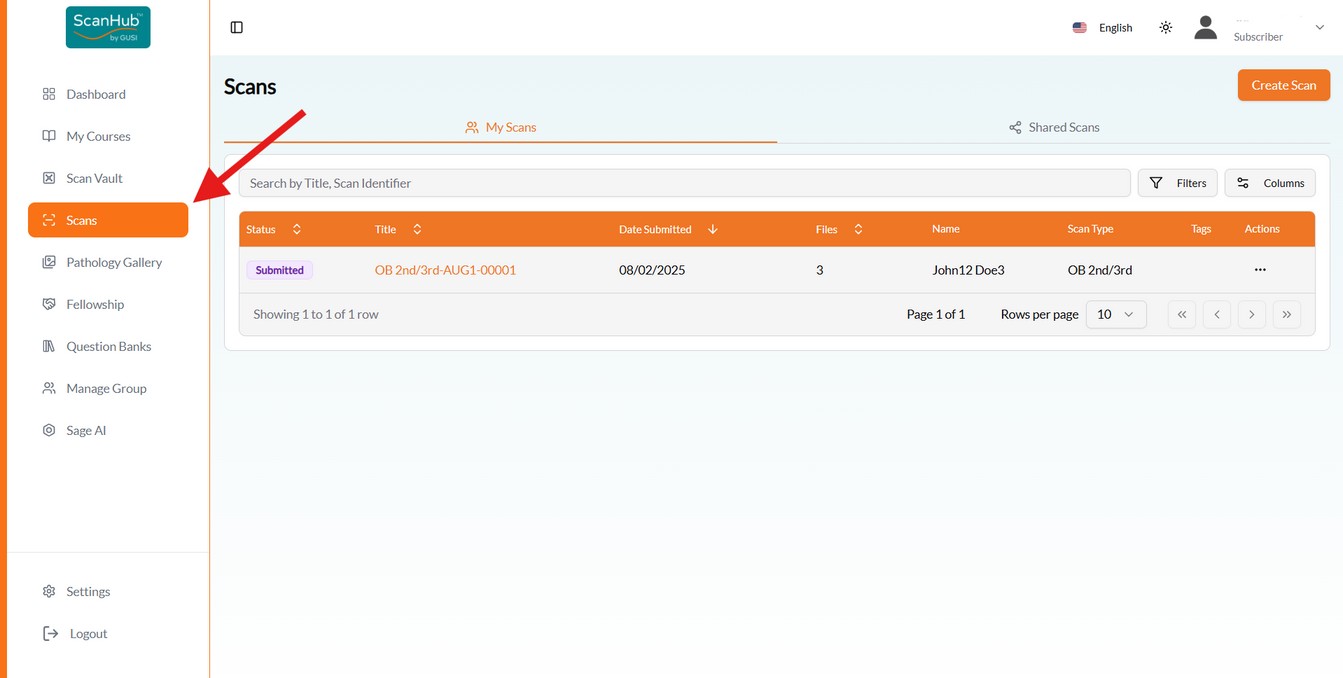
- Click Scan Study on the left side of the screen, then Create Scan at top right.
- Drag and drop (or click to select) your cine loops (MP4/DICOM) and still images (PNG/JPEG/DICOM). Each file should represent one view (e.g., “RUQ FAST,” “PLAX,” “Popliteal Vein”). Keep each file within the accepted formats and size limit.
- Repeat until all files for the exam are uploaded, then click Next.
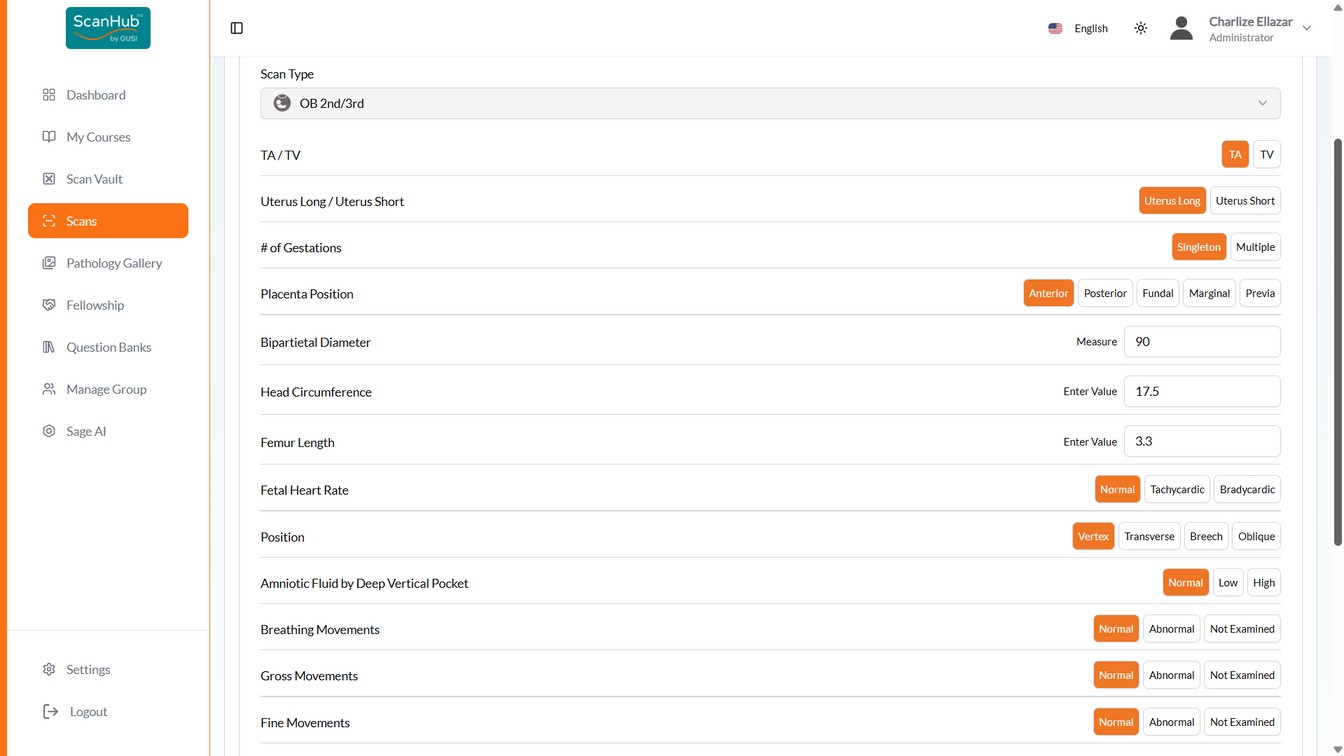
- Select the Scan Type from the dropdown — the page transitions to the submission form.
- Fill out the required interpretation fields (scroll to see all). Normal findings appear green; abnormal appear red. Use the patient presentation & clinical question field for scanning/technical issues and questions for reviewers.
- Click Submit. You can then go to the Scan List, Scan Details, or create another scan.
Terminology: a “file” is one image or video; a “scan” is all files associated with one patient in one encounter — e.g., a 2nd-trimester OB scan might include amniotic fluid, placenta, fetal position, and heart rate images plus a video showing a single fetus.
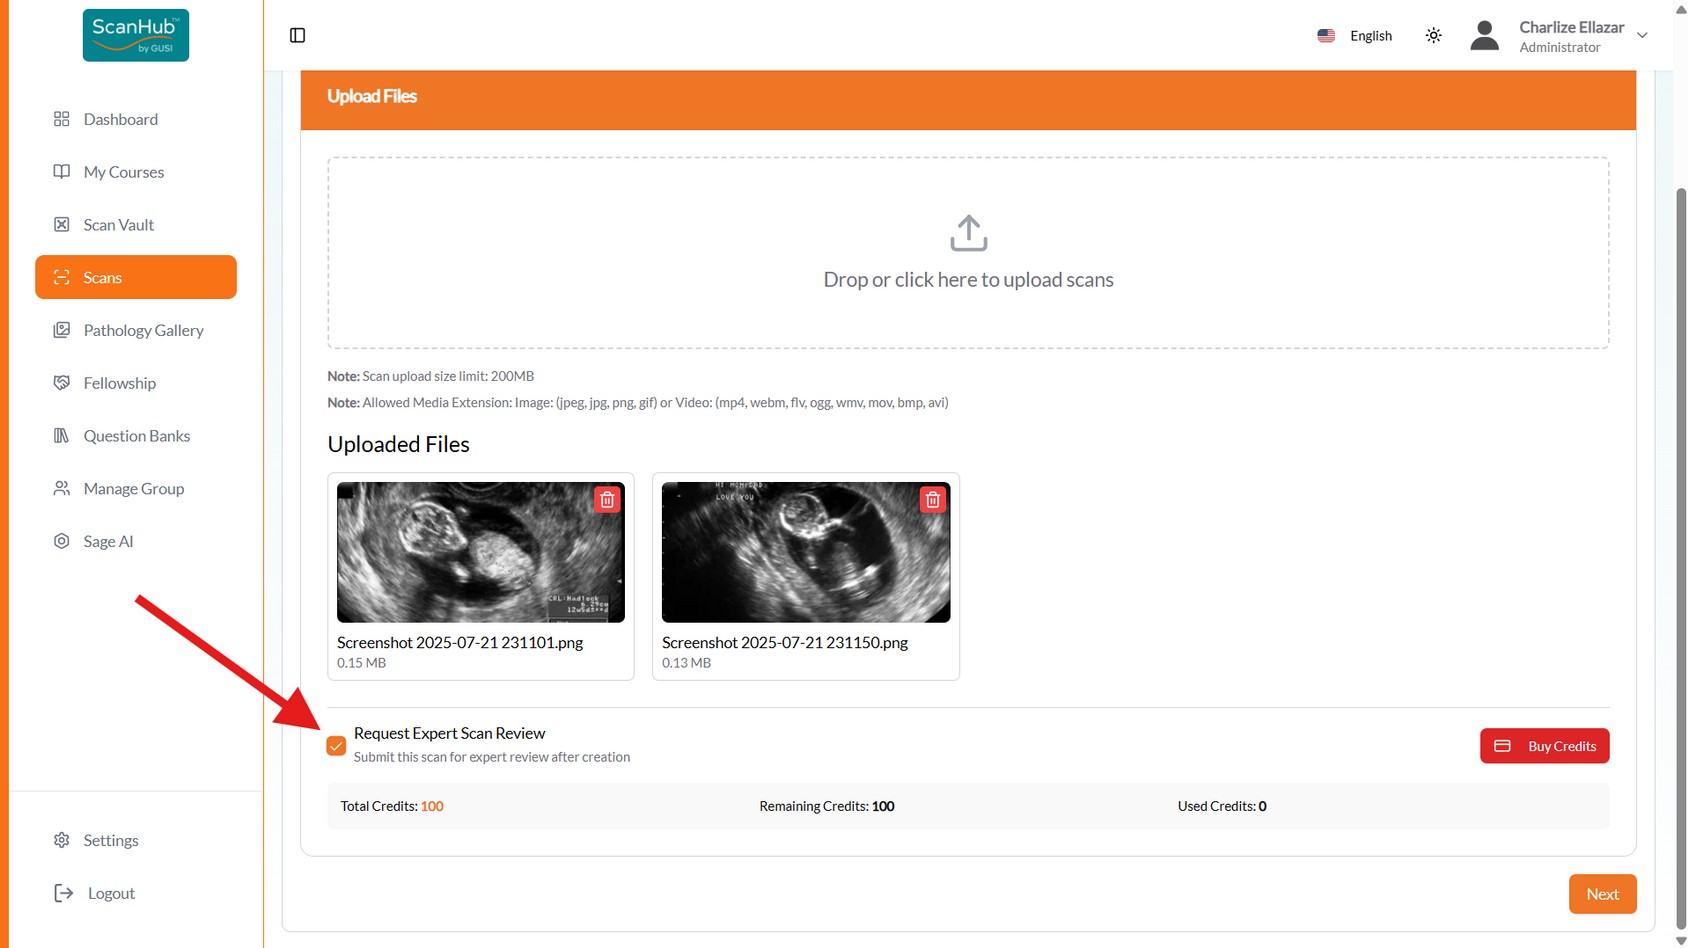
Requesting Expert Scan Review
- If your fellowship includes GUSI scan review (standard), check “Request Expert Scan counts as one of your paid scans
Review” during file upload — the GUSI team will review with detailed feedback and it
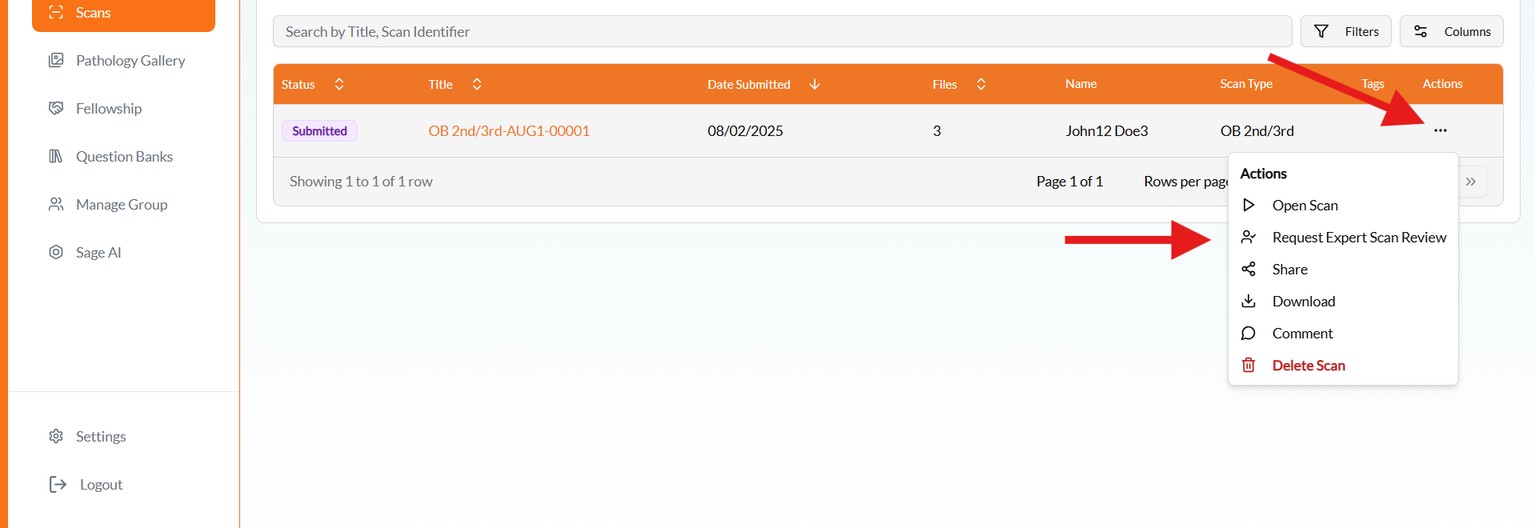
- Forgot to check the box? Open the menu button beside the submitted scan in the Scans list and make the request there
- Make sure you have enough credits — buy more via the Buy Credits button in the Credit
Information section
- Reviews are usually returned within 72 business hours; read detailed feedback under
Reviewed
Managing Submitted Scans
- The Scans list shows whether scans were properly submitted or still in draft form; click a scan’s title to reopen and submit drafts later
- View, email, or download scans from the actions on the right
- You’ll receive an email or in-app notification once a mentor completes the review
Web Tips & Cautions
- Keep filenames short and descriptive (e.g., Echo_PLAX_6s.mp4)
- Confirm videos play back correctly before submission
- If uploads stall: refresh and retry smaller batches (2–3 files), try a different device or network, or upload one file at a time
- Very large uploads may fail — trim cine loops to 6 seconds maximum
- All uploads are encrypted in transit and automatically de-identified
Creating a new scan lets you upload medical imaging files (ultrasound, CT, or other types) for documentation, review, learning, or remote consultation. Watch the companion videos: Scan Upload and Review Tutorial · Scan Upload and Review (dubbed) .
Create a New Scan (3 Steps)
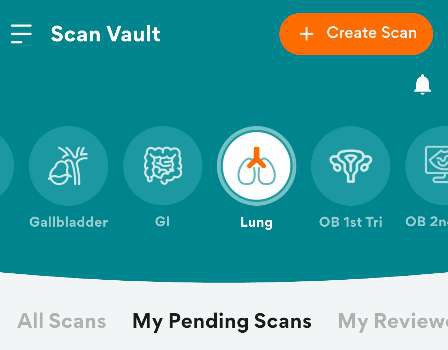
Step 1 – Tap Create Scan. Open the ScanHub app, log in with your GUSI credentials, navigate
to My Scans, then tap + Create Scan in the upper right corner.
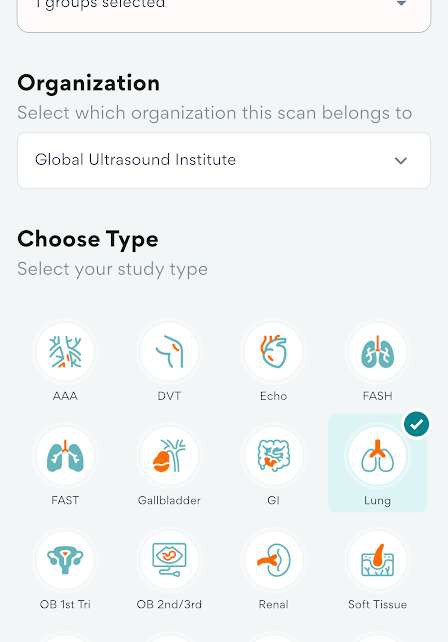
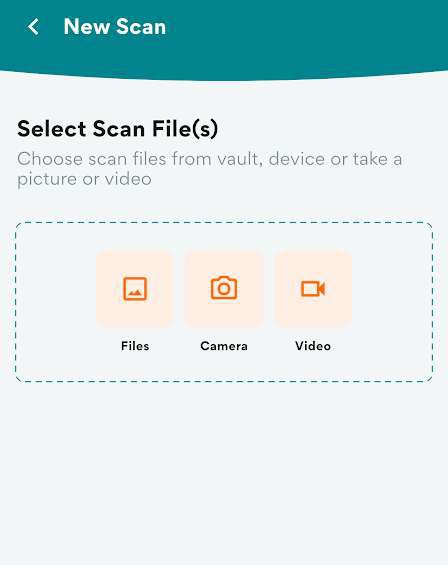
Step 2 – Choose a source and study type. Tap any option to upload a scan — select from
ScanVault, Gallery (Photos), Camera, or Video, then choose the study type. Tap Next when done.
Step 3 – Select findings. Select the appropriate findings. Optionally enter a scan identifier and
notes. Tap Next, then Submit. A notification will track the upload progress.
Adding Clips & Stills
- Tap ScanVault, Photos, Camera, or Video to select your ultrasound images or clips
- Keep each clip 3–6 seconds — no longer — for smoother playback and faster mentor review
Labeling & Organizing
- Scan type: e.g., FAST, Echo, DVT, OB 1st Trimester
- Views obtained: e.g., PLAX, A4C, short, long, CBD
- Relevant findings: e.g., decreased EF, pericardial effusion, gallstones
- Comments/questions for your reviewer: “Is this RV enlargement?” · “Does this compression look adequate?”
- De-identification: ensure all files are de-identified before submission (ScanHub automatically removes PHI when files are imported via the GUSI workflow)
Submitting & Tracking
- Once all clips and stills are labeled, tap Submit Exam (or Sync / Upload).
- Confirm the upload reaches 100% — the label “server synced” means it succeeded.
- On poor connections, the app stores the upload and automatically retries when the connection is restored.
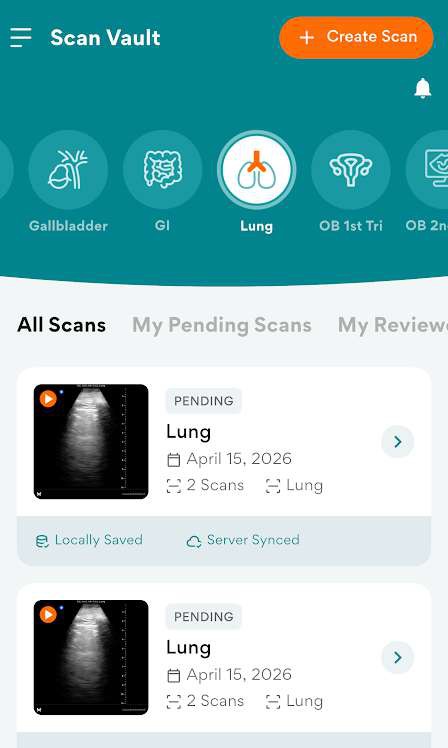
- Pending Scans tab: submitted studies are tagged pending until reviewed
- Reviewed Scans tab: scans that have already been reviewed
Reviewing Mentor Feedback
- Open the app → My Scans → My Reviewed Scans.
- Tap the exam to view mentor notes.
- Compare your next scans with the feedback and re-upload improved versions.
Mobile Tips & Cautions
- Use Wi-Fi for uploading cine loops; cellular uploads may fail if >50 MB
- Upload both normal and abnormal scans for practice
- Check that each clip plays correctly before hitting Submit
- If you cannot upload via the app, use the web portal (Part 4)
Purpose: Secure storage for organizing and managing your medical scans and imaging data.
- Upload new scans and images; organize by patient, date, or case type
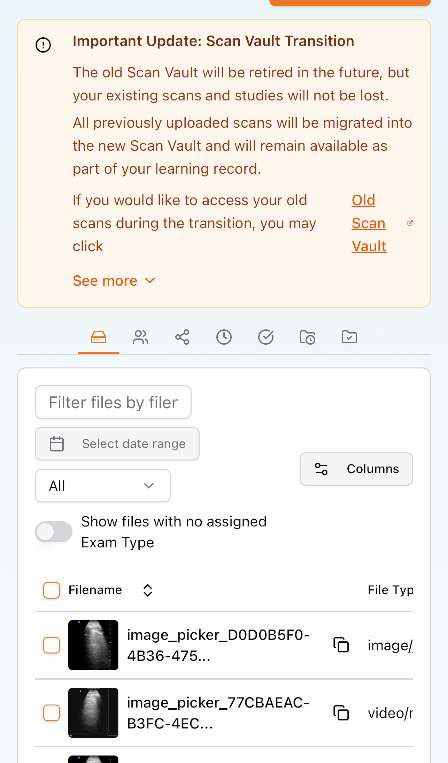
- Apply tags and metadata for easy searching; share securely with mentors or colleagues lost — they will be migrated into the new Scan Vault. Access older scans via the Old Scan Vault link (ScanHub Web App only).
Migration note: The old Scan Vault will be retired, but existing scans and studies will not be
Scans
Purpose: Your active workspace for detailed scan analysis and review.
- Open scans for analysis; use measurement and annotation tools
- Compare scans side-by-side; generate reports and findings
- Collaborate with team members on interpretations; save work in progress